Gel medium image transfer, background card is zsa zsa (new colour) tinted in places with ink. Hand doodling, rubber stamping.
For this one, I noticed the way the transfer had left a little black patch at the bottom right hand side - and thought I would hand-draw a flower into it.

31 October 2007

Aqua and White dots
Gel medium image transfer, background card is zsa zsa (new colour) tinted in places with ink. Hand doodling, rubber stamping.

do you like me
Background hand coloured with inks, collage image, rub-ons, edging and embellishment. I like the colours and simplicity of this one.

loves me, loves me not
Background hand coloured with inks, collage image, rub-ons, edging and embellishment. I like the colours together on this one :)

30 October 2007
watercolour angel set of 6
A set of 6 - 5 available to trade.
Finished these off today, from last week.... oh the joy in finishing and completing these mini works of art... the pleasure was all mine :)
These were hand watercoloured images. I used rubber stamps, doodled, painted and rub-ons - what more could a girl want?

Finished these off today, from last week.... oh the joy in finishing and completing these mini works of art... the pleasure was all mine :)
These were hand watercoloured images. I used rubber stamps, doodled, painted and rub-ons - what more could a girl want?

scan 1
A batch scan of some of the atc's i completed today :) - yup finally got some time to do art, how wonderful it was to create today!!

24198754
Lumiere painted background, rubber stamping, hand drawing, stamp painted with lumiere, embellishment.


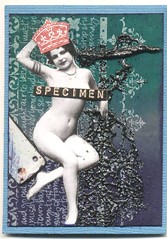
specimen
Fusible webbing embossed, background hand coloured using inkpads, collage image, rubber stamping (crown)


23 October 2007
17 October 2007
Alphabet & Text ATC SWAP on Scrappindipity's Flickr Group
Hi Everyone,
Because I love words, quotes, script and beautiful lettering - I have decided on this, for our next theme for Scrappindipity. All our flickr group members, friends and customers are most welcome to participate...
Think gorgeous lettering, script, quotes, words, chipboard alphas, stories etc - all atc's must contain a letter of the alphabet (or more) or some text on them - the rest is up to you! Play with it, have fun and let your imagination run free - no straight digitals please - unless embellished.
Here's the Info for the swap:
Alphabet & Text Swap
6 for 6 (7 for 6 international includes the extra atc for postage)
due date November 30th, 2007
Postage $1.00 (Australia)
Postage International - FREE -
In exchange, please send one extra atc (not same theme) from your collection, and a little ephemera. Posting international can cost up to $5.00 australian - so please bear this in mind when choosing your extra atc :)
Please sign up on the Scrappindipity Flickr Group page: (you may have to join flickr and our group - but it's free and full of lovely eye-candy and is the best place for picture hosting I have found)
CLICK THE TITLE TOPIC TO GO DIRECTLY TO THE SCRAPPINDIPITY GROUP PAGE :)
http://www.flickr.com/groups/scrappindipity/discuss/72157602464581925/
12 October 2007
Red be strong
Like the other two -
I used some background paper (Collections) and resisted it with my impress dye based inkpads using cottonwool balls in the ink. I used a vintage nude collage image, rub-ons, german scrap wings, then made a little embellishment with my punches and bordered the edges using my trusty gel pen to doodle.
I really liked making these, and the colours are my favourites.
red flirt
For this one, like the other... I used some background paper (Collections) and resisted it with my impress dye based inkpads using cottonwool balls in the ink. I used a vintage nude collage image, rub-ons, german scrap wings, then made a little embellishment with my punches and bordered the edges using my trusty gel pen to doodle.
I really liked making these, and the colours are my favourites.

I really liked making these, and the colours are my favourites.
red hold me tight
I used some background paper (Collections) and resisted it with my impress dye based inkpads using cottonwool balls in the ink. I used a vintage nude collage image, rub-ons, german scrap wings, then made a little embellishment with my punches and bordered the edges using my trusty gel pen to doodle.
I really liked making these, and the colours are my favourites.

I really liked making these, and the colours are my favourites.
Lavender Girl no 2
Another risque (for those who requested more to trade) :))
I hand painted the background with lumiere paints (metallic) and then transferred the image with the polymer medium (available at Scrappindipity Freo) I doodled with my fave white gel pen, added a little strip of velour down the side for some texture and a couple of eyelets... and embossed the edging.

I hand painted the background with lumiere paints (metallic) and then transferred the image with the polymer medium (available at Scrappindipity Freo) I doodled with my fave white gel pen, added a little strip of velour down the side for some texture and a couple of eyelets... and embossed the edging.
Lavender Girl no 1
Another risque (for those who requested more to trade) :))
I hand painted the background with lumiere paints (metallic) and then transferred the image with the polymer medium (available at Scrappindipity Freo) I doodled with my fave white gel pen, added a little strip of velour down the side for some texture and a couple of eyelets... and embossed the edging.

I hand painted the background with lumiere paints (metallic) and then transferred the image with the polymer medium (available at Scrappindipity Freo) I doodled with my fave white gel pen, added a little strip of velour down the side for some texture and a couple of eyelets... and embossed the edging.
Lavender Girl no 3
Another risque (for those who requested more to trade) :))
I hand painted the background with lumiere paints (metallic) and then transferred the image with the polymer medium (available at Scrappindipity Freo) I doodled with my fave white gel pen, added a little strip of velour down the side for some texture and a couple of eyelets... and embossed the edging.

I hand painted the background with lumiere paints (metallic) and then transferred the image with the polymer medium (available at Scrappindipity Freo) I doodled with my fave white gel pen, added a little strip of velour down the side for some texture and a couple of eyelets... and embossed the edging.
Lavender Girl no 4
Another risque (for those who requested more to trade) :))
I hand painted the background with lumiere paints (metallic) and then transferred the image with the polymer medium (available at Scrappindipity Freo) I doodled with my fave white gel pen, added a little strip of velour down the side for some texture and a couple of eyelets... and embossed the edging.

I hand painted the background with lumiere paints (metallic) and then transferred the image with the polymer medium (available at Scrappindipity Freo) I doodled with my fave white gel pen, added a little strip of velour down the side for some texture and a couple of eyelets... and embossed the edging.
24 New atc's
Today I finally got around to scanning my newest atc's - Well most of them anyway LOL
I did 24 - If you would like a trade, just give me a yell :)
I did 24 - If you would like a trade, just give me a yell :)


home sweet 5 of 6
A series of 6 different cards can be seen on my flickr site. Here's one of the series.
Gel medium transfer, deco sticker, rub-ons, hand painted background, collage element.

Gel medium transfer, deco sticker, rub-ons, hand painted background, collage element.
sharon
Lumiere painted background, Gel Transfer, pen doodling, collections decorative strip, german scrap, rubber stamping. I made this one while a new friend from Sydney was visiting - and I named this card after her :) We had a fun day, and it was great to 'play' with someone so like-minded.

6 October 2007

5 October 2007
something i love swap
I joined the swap "Something I love" and i just couldn't decide what to do. Eventually I decided to incorporate a few of my favourite things at the moment.... gel medium transfers, doodling, rub-ons, german scrap borders and the colours red and black :)
This was my result. I hope whoever gets them will like them.

This was my result. I hope whoever gets them will like them.
Rouge de Garance papers
New Rouge de Garance papers have just hit the shelves. The brand new ‘ailes ou fleur’ range has vibrant greens and aquas working together with browns and beige. The 6 papers are double sided, and there’s no ‘right side’ either - both sides are so stunning that I’ll be needing 2 of each so that I don’t have to choose which to use.
We also have the Black and White range "CUPIDON" - they are gorgeous too.
So now I need to make something with them :)
You can check the website here:
http://www.rougedegarance.com/en/contact/home_rouge_de_garance.php
We also have the Black and White range "CUPIDON" - they are gorgeous too.
So now I need to make something with them :)
You can check the website here:
http://www.rougedegarance.com/en/contact/home_rouge_de_garance.php
Gel Medium Transfer Tutorial
Hi all,
I have had several requests for a tutorial on the Gel Medium Transfers - so here you all are - please post any questions etc, your success stories/comments etc here in this discussion by 'commenting' I would love to see what you have created.
Enjoy - it's a wonderful technique which does take some trial and error to get right.
Here we go........
I use a polymer gloss for all my transfers, as some glaze pastes, gel mediums just will not work. So look for the Matisse Polymer Gloss one (we sell it in Scrappindipity) I have heard people having success with the Golden Gel medium too - but can't personally endorse that one.
Firstly you will need to have a good quality paintbrush to use, as a chunky low quality brush will leave too many brushmarks and spoil your overall look... that said though, if you want that look specifically - go for it.!
Choose toner based images (photocopies work best) some ink-jet printers that use durabrite inks also work.
Choose your base card - coat this card with a thin coating of the gel medium - this protects it for a later stage, when you start to 'rub off' your backing paper off the transfered image. I don't always do this, as long as you are very careful with your 'rubbing off' it can be ok to not coat the basecard.
Let it dry. (2 mins max with the matisse gel)
Coat your image to be transfered with the gel medium, (over the right side of the image)
(Some papers and cards require more or little gel medium so experiment with this)
Now lay this image down onto your pre-coated cardstock (gel down onto cardstock) and burnish the back with a popstick or bone folder for around 30 seconds.... this can be trial an error depending on how much gel medium you have applied... try and find out which works best for you - less gel medium or more gel medium.
Sometimes you can burnish the back of the image, and let it dry completely - leaving the 'rubbing off' part until another time.
Finding a corner of the image, start to peel off the backing paper carefully - you should see some of the paper sticking with the image attached to your base-card. So far, so good...
When you have removed this layer of paper, you get a glass/bowl of water, dip in your finger (not too much water needed) and slowly rub in circles over the transfered image to remove the excess paper residue/glue.
This is a slow process and can be done several times to remove the little white fibres. Once you have done this and the image dries, you will see more white fibres from the paper - again dip your finger and gently rub them off.
When you are happy with the look, you can then apply a coat or two, of 'Glaze Paste' (my favourite for sealing, as it finds it's own level and leaves NO brushstroke marks whatsoever!!) You can use the same polymer gel medium over the top too, it works, but does leave brushstroke marks. Or choose another sealer/varnish of your choice.
When you apply the sealer/glaze paste/ or gel medium over the transfered image, it will minimize any white paper residue - so this is the cool and fun part... seeing how your image is really going to look when finished.
When the sealer you choose (glaze paste/gel medium/varnish etc) has dried you can sit back and admire your work.
Get ready for some serious finger rubbing - oh an extra little tip I discovered.... a little wad of 'wet wipes or baby wipes' rubbed gently over the transfer can save your fingers from getting too sore!! But rub very carefully or you will remove your transfer.
Have fun, hope you enjoyed my tutorial - I would love to hear how you went.Thanks!
Lorri xo
Subscribe to:
Posts (Atom)